Architect-designed homes demand lighting that honours their form whilst serving everyday life. Many homeowners struggle to balance aesthetic intent with practical illumination, resulting in spaces that feel either over-lit or underwhelming. This guide walks you through the essential steps for planning, executing, and refining architectural lighting schemes that enhance your home’s character and support how you live. You’ll learn how to layer light effectively, avoid common pitfalls, and create environments that adapt to your needs throughout the day.
Table of Contents
- Key takeaways
- Understanding the basics: what you need for effective architectural lighting
- Planning your lighting design: evaluating your space and goals
- Executing your lighting plan: installation tips and common mistakes to avoid
- Verifying and refining your lighting setup for lasting impact
- Enhance your home’s lighting with expert solutions
- Frequently asked questions
Key Takeaways
| Point | Details |
|---|---|
| Layered lighting balance | Using ambient, task and accent lighting together creates rooms that feel balanced and adaptable throughout the day. |
| Plan with architect | Collaborating with your architect or designer in planning helps position fixtures and routes to align with structure and avoid costly alterations. |
| Smart controls matter | Dimmers and smart controls enable meaningful scheduling and scene setting while improving comfort and efficiency. |
| Daylight integration | Integrating daylight with artificial lighting, including shutters, creates layered illumination that responds to seasons and activities. |
Understanding the basics: what you need for effective architectural lighting
Architectural lighting shapes how you experience your home. It reveals textures, defines spaces, and supports daily activities from reading to entertaining. In architect-led properties, lighting must integrate with structural elements and material choices, enhancing rather than competing with the design narrative.
Successful lighting relies on three distinct layers working together. Ambient lighting provides overall illumination, filling rooms with comfortable, even light that allows safe movement and general visibility. Task lighting focuses on specific activities like cooking, reading, or grooming, delivering concentrated brightness where precision matters. Accent lighting highlights architectural features, artwork, or materials, adding depth and visual interest to your spaces.
Each layer serves a purpose, and their combination creates environments that feel balanced and intentional. When one layer dominates, rooms feel flat or uncomfortable. When all three work in harmony, your home adapts to different needs throughout the day.
Before installation begins, gather the components that make your lighting scheme possible. You’ll need fixtures appropriate to each layer, from recessed downlights for ambient coverage to adjustable spotlights for accent work. Control systems matter as much as the fixtures themselves. Dimmers allow you to adjust intensity, whilst smart controls enable scheduling and scene creation. Wiring infrastructure must support your intended layout, and planning this early prevents costly alterations later.
Pro Tip: Work with your architect or designer during the planning phase to identify ideal fixture locations and ensure wiring routes align with structural elements, avoiding conflicts with beams, ducts, or insulation that could compromise installation quality.
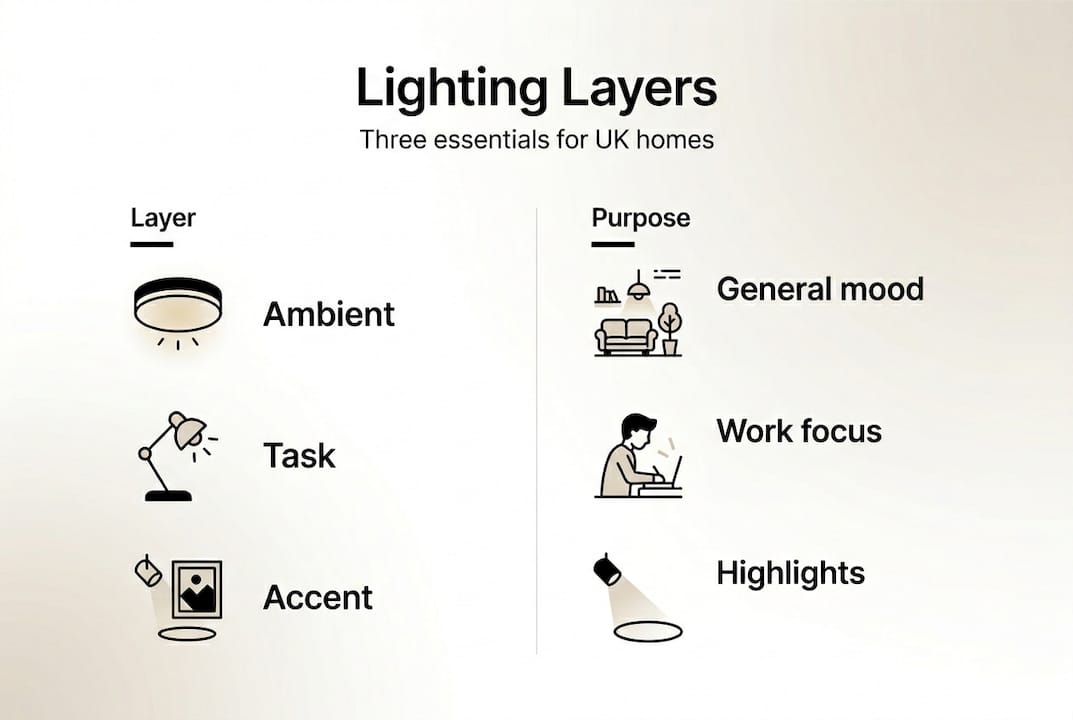
The table below summarises how each lighting layer functions within your home:
| Lighting Layer | Primary Function | Typical Fixtures | Ideal Applications |
|---|---|---|---|
| Ambient | General illumination for safe movement and visibility | Recessed downlights, pendant lights, wall washers | Living areas, hallways, bedrooms |
| Task | Focused light for specific activities requiring precision | Under-cabinet strips, desk lamps, vanity lights | Kitchens, studies, bathrooms |
| Accent | Highlighting architectural features and creating visual interest | Adjustable spotlights, picture lights, uplights | Artwork, textured walls, alcoves |
Choosing quality components matters. LEDs offer longevity and efficiency, reducing maintenance and running costs. Select fixtures with appropriate IP ratings for bathrooms and outdoor areas. Consider colour temperature carefully. Warmer tones (2700K-3000K) suit living spaces, whilst cooler temperatures (4000K) work well in kitchens and bathrooms where clarity matters.
Integrating home lighting with shutters allows you to control natural light alongside artificial sources, creating layered illumination that responds to changing daylight conditions throughout the year.
Planning your lighting design: evaluating your space and goals
Effective lighting begins with understanding your home’s unique characteristics. Each room presents different opportunities and constraints based on architecture, natural light, and how you use the space. A systematic evaluation ensures your lighting scheme responds to these factors rather than imposing a generic solution.
Start by observing natural light patterns throughout the day. Note which rooms receive morning sun, where shadows fall in the afternoon, and how light quality changes with seasons. This understanding informs artificial lighting decisions, allowing you to complement daylight rather than fight against it. Rooms with abundant natural light need less ambient illumination during daytime hours but require thoughtful evening lighting to maintain comfort after dark.
Consider how you use each space. A kitchen demands bright, even task lighting over work surfaces, whilst a sitting room benefits from flexible ambient and accent layers that support both reading and relaxed conversation. Bedrooms require gentle illumination for winding down alongside focused task lighting for dressing. Your lifestyle shapes these requirements. If you work from home, study lighting becomes crucial. If you entertain frequently, dining and living areas need adaptable schemes that create appropriate moods.
Architectural features guide fixture placement and selection. High ceilings accommodate pendant lights and chandeliers that would overwhelm standard-height rooms. Exposed beams create opportunities for uplighting that emphasises structure. Textured walls and stone surfaces respond beautifully to grazing light that reveals their character. Identify these elements early so your lighting enhances rather than obscures them.

A carefully designed lighting workflow ensures seamless ambience and complements architectural features, creating cohesive environments that feel intentional across your entire home.
Follow this planning sequence to develop your lighting scheme:
- Survey each room, noting dimensions, ceiling heights, and architectural features that influence lighting decisions.
- Document natural light sources and patterns, identifying where supplementary illumination will be most valuable.
- List activities that occur in each space, determining task lighting requirements and ambient levels needed for comfort.
- Identify focal points like artwork, fireplaces, or feature walls that warrant accent lighting to create visual interest.
- Sketch initial fixture layouts, considering spacing, beam angles, and how different layers will work together.
- Select control strategies, deciding where dimmers, switches, or smart automation will provide the flexibility you need.
- Review your plan with professionals who can identify technical considerations and suggest refinements before installation begins.
Pro Tip: Consider how lighting interacts with your home’s materials and finishes, as reflective surfaces amplify light whilst darker textures absorb it, affecting the quantity and quality of illumination needed to achieve your desired effect.
Set realistic goals based on your budget and timeline. Complex schemes involving extensive automation or bespoke fixtures require longer lead times and higher investment. Prioritise areas where lighting makes the greatest impact, then expand to secondary spaces as resources allow. This phased approach delivers results without overwhelming the project.
Executing your lighting plan: installation tips and common mistakes to avoid
Translating your lighting design into reality demands attention to detail and awareness of common pitfalls that compromise results. Even well-conceived plans falter when execution overlooks technical requirements or practical considerations.
Fixture placement errors rank among the most frequent mistakes. Recessed downlights positioned too far apart create patchy illumination with dark zones between pools of light. Spacing them too closely wastes energy and produces harsh, over-lit environments. Follow manufacturer guidelines for spacing based on ceiling height and beam angle. As a general rule, divide ceiling height by two to determine spacing in feet. A 2.4-metre ceiling suggests fixtures roughly 1.2 metres apart for even coverage.
Incorrect fixture height affects both function and aesthetics. Pendant lights over dining tables should hang 75-90 centimetres above the surface, low enough to illuminate the table without obstructing sightlines. Kitchen island pendants follow similar principles. Wall sconces in hallways sit best at 1.5-1.7 metres from the floor, providing comfortable illumination without glare at eye level.
Bulb selection matters as much as fixture choice. Mixing colour temperatures within a space creates visual discord, with some areas appearing warm and others cool. Maintain consistency within rooms, varying temperature only between distinct zones. Select appropriate wattages for each fixture type. Overlighting is as problematic as underlighting, creating harsh environments that feel uncomfortable.
Poor lighting installation can compromise design intent and user comfort in architected homes, turning thoughtfully planned schemes into disappointing results that fail to enhance daily living.
Follow this installation sequence to ensure quality outcomes:
- Verify electrical capacity and circuit layouts can support your lighting load without overloading existing infrastructure.
- Mark fixture locations precisely, using templates and levels to ensure alignment and symmetry where design requires it.
- Install wiring and junction boxes according to regulations, leaving adequate slack for connections and future maintenance access.
- Mount fixtures securely, following manufacturer instructions and using appropriate fixings for ceiling and wall types.
- Connect controls and dimmers, testing functionality before closing walls or ceilings to avoid costly rework later.
- Install bulbs and test each circuit, checking for proper operation and identifying any issues whilst access remains easy.
- Programme smart controls and scenes if applicable, configuring schedules and sensor responses to match your preferences.
Practical installation tips include:
- Label all circuits clearly during installation, making future troubleshooting and modifications straightforward for you or subsequent electricians.
- Photograph wiring layouts before closing walls, creating a reference that proves invaluable when alterations or repairs become necessary years later.
- Test dimmer compatibility with your chosen bulbs, as not all LEDs dim smoothly or to low levels without flickering or buzzing.
- Allow adequate ventilation around recessed fixtures, particularly in insulated ceilings where heat buildup can shorten bulb life and create fire risks.
- Install junction boxes that accommodate future fixture changes, avoiding the need to cut new holes if you upgrade or modify your scheme later.
- Consider cable management for visible wiring, using conduits or routing paths that maintain clean lines consistent with your home’s aesthetic.
Complex installations warrant professional assistance. Whilst simple fixture swaps suit confident DIY work, whole-home schemes involving automation, multiple circuits, or structural modifications benefit from qualified electricians who ensure safety and compliance with building regulations. Their expertise prevents mistakes that cost more to rectify than initial professional installation would have demanded.
Verifying and refining your lighting setup for lasting impact
Once installed, your lighting system requires assessment and optimisation to deliver its full potential. Initial settings rarely prove ideal, and minor adjustments often yield significant improvements in comfort and functionality.
Evaluate your lighting at different times of day and during various activities. Does ambient light provide adequate visibility without feeling harsh? Can you read comfortably where task lighting serves? Do accent lights create the visual interest you intended without overwhelming other layers? Live with your system for several weeks, noting what works and what feels lacking.
Control systems dramatically affect how you experience lighting. Manual switches offer simplicity but limited flexibility. Smart controls provide scheduling, scene creation, and automation that adapts lighting to your routines without conscious intervention. The comparison below highlights key differences:
| Control Type | Advantages | Limitations | Best Suited For |
|---|---|---|---|
| Manual switches | Simple, reliable, low cost, no learning curve required | Limited flexibility, requires physical interaction, no automation or scheduling possible | Small homes, single-room installations, budget-conscious projects |
| Dimmer switches | Adjustable intensity, improved ambience, energy savings, moderate cost | Still requires manual adjustment, no automation, limited scene creation capability | Individual rooms, retrofit projects, intermediate lighting control needs |
| Smart controls | Full automation, scheduling, scene creation, remote access, integration with other systems | Higher initial cost, requires configuration, potential connectivity issues, learning curve | Whole-home schemes, tech-comfortable users, those seeking maximum flexibility and efficiency |
Smart lighting control systems enhance home comfort and energy efficiency, allowing your lighting to respond intelligently to occupancy, time of day, and natural light levels without requiring constant manual adjustment.
Maintenance preserves your lighting investment and ensures continued performance. Regular tasks include:
- Clean fixtures and lenses quarterly to maintain light output, as dust and grime reduce brightness and alter colour quality over time.
- Replace failed bulbs promptly to maintain even illumination and prevent remaining bulbs from carrying excessive load that shortens their lifespan.
- Test dimmer and control functionality periodically, addressing any responsiveness issues before they develop into complete failures requiring urgent repair.
- Inspect visible wiring and connections annually, looking for signs of wear, overheating, or loose connections that could create safety hazards.
- Update smart system firmware when manufacturers release improvements, ensuring optimal performance and security for connected lighting controls.
- Review and adjust automated schedules seasonally, accounting for changing daylight hours and how you use spaces differently throughout the year.
Pro Tip: Integrate occupancy sensors in circulation spaces like hallways and utility rooms, ensuring lights activate only when needed whilst eliminating the annoyance of fumbling for switches in the dark or wasting energy when spaces sit empty.
Refinement continues beyond initial commissioning. As you live with your lighting, you’ll identify opportunities for improvement. Perhaps a reading chair needs additional task lighting. Maybe accent lights would better serve a different artwork. Smart controls make experimentation easy, allowing you to test adjustments before committing to physical changes.
Document your final settings and scenes. If you use smart controls, export configuration files as backups. Label circuits clearly in your consumer unit. These records prove invaluable when troubleshooting issues or making future modifications, saving time and preventing confusion for anyone working on your system.
Enhance your home’s lighting with expert solutions
Whilst this guide equips you to approach architectural lighting with confidence, some projects benefit from professional insight that accelerates results and unlocks possibilities beyond DIY scope. If you’re planning a comprehensive lighting scheme or seeking seamless integration with broader home automation, our lighting design workflow guide details how we collaborate with homeowners and architects to create cohesive, thoughtful environments.

Our approach centres on understanding how you live, then designing systems that support your routines without demanding constant attention. Lighting automation transforms how your home responds throughout the day, adjusting scenes automatically whilst giving you complete control when you want it. For architect-led properties, smart home lighting solutions integrate with your home’s design language, enhancing rather than compromising its aesthetic intent. If you’d like to discuss how this could work in your home, call 01793 315930 or explore our brochure to see what’s possible.
Frequently asked questions
What are the best types of architectural lighting for UK homes?
Architect-designed homes benefit most from layered schemes combining ambient, task, and accent lighting, each serving distinct purposes that together create balanced, adaptable environments. LEDs offer the most practical choice for UK properties, delivering excellent colour rendering, longevity, and efficiency whilst handling our climate’s temperature variations without performance degradation. Explore types of home lighting to understand which fixtures and approaches suit different spaces within your home.
How can I make my architectural lighting more energy efficient?
Smart controls, dimmers, and timers dramatically reduce energy waste by ensuring lights operate only when needed and at appropriate intensities for each activity. Selecting LEDs over traditional bulbs cuts consumption by up to 80% whilst lasting years longer, reducing both running costs and maintenance demands. Occupancy sensors in circulation spaces and automatic scheduling aligned with your routines further optimise efficiency. Learn more about smart home lighting energy savings and how thoughtful design reduces consumption without compromising comfort or aesthetics.
What common mistakes should I avoid when designing home lighting?
Inadequate layering creates spaces that feel flat or uncomfortable, whilst poor fixture placement produces uneven illumination with dark zones and glare issues that undermine both function and aesthetics. Failing to plan control systems and wiring infrastructure early forces compromises later, often requiring expensive remedial work to achieve the flexibility you need. Following a structured lighting design checklist helps you address these considerations systematically, ensuring your scheme delivers the results you envision without costly mistakes that compromise outcomes.
When should I involve professionals in my lighting project?
Complex installations involving whole-home automation, multiple circuits, or integration with architectural features warrant professional expertise from the planning stage onwards. Qualified lighting designers and electricians identify technical constraints, suggest solutions you might not consider, and ensure compliance with building regulations that protect safety and property value. Even if you handle simpler aspects yourself, professional consultation during planning prevents mistakes that cost more to rectify than initial expert involvement would have required, whilst often revealing opportunities that enhance your final result beyond what DIY approaches typically achieve.